Origami Boat (It Floats!)
Learn how to make an easy origami boat that floats! Both adults and kids can make a boat from paper in just a few easy steps.

Ahoy there, paper-folding enthusiasts! Today, we’re setting sail on a new adventure with one of the most classic and beloved origami projects: the origami boat.
Whether you’re a seasoned folder or a complete beginner, this project is perfect for you. It’s quick, it’s easy, and it’s a ton of fun. Did I mention it actually floats?
So, grab your paper, and let’s get folding!
In Japanese culture, boats hold special significance. They symbolize voyages, adventures, and the journey of life itself. Just like in life, every fold and crease you make in origami is a step towards creating something beautiful.

So, as we fold our boats today, let’s think about the journeys we’re on and the adventures that lie ahead. Isn’t it amazing how much meaning can be packed into a simple piece of paper?
Now, if you’re new to origami, don’t worry! The paper boat origami is one of the easiest models to start with. All you need is a single sheet of paper, a bit of patience, and a willingness to have some fun.
And if you’re a pro, this is a great project to share with friends or kids. It’s a fantastic way to introduce others to the wonderful world of origami.
Scroll down to follow our step-by-step guide on how to fold this boat. We’ll walk you through each fold, making it easy to follow along (there’s a video at the bottom). By the end of this tutorial, you’ll have your very own paper boat, ready to set sail on its maiden voyage.

Get ready to impress your friends, family, and maybe even yourself with your newfound paper-folding skills. Let’s make some memories and some boats together! Happy folding!
How to Make a Paper Boat
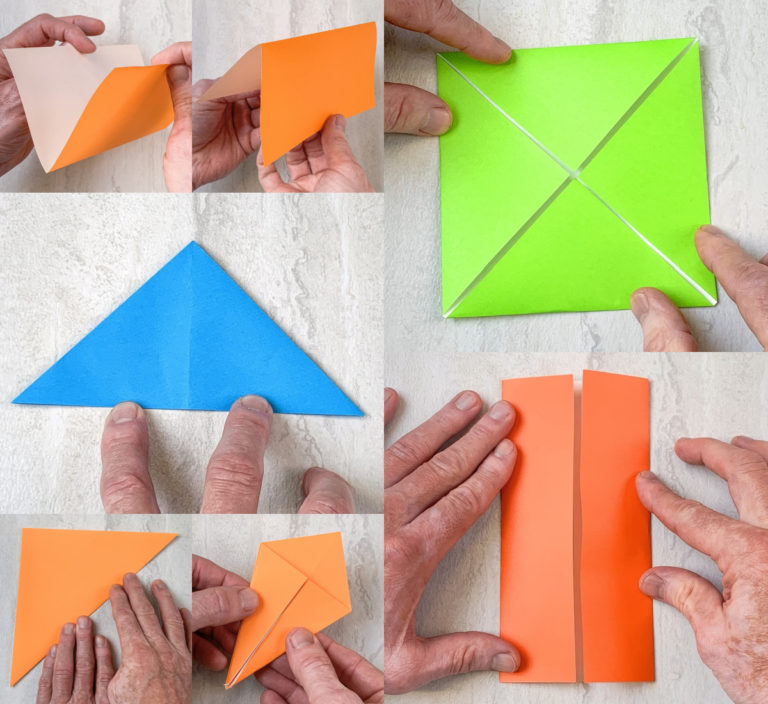
Begin with a 15 cm (6″) square piece of paper (or size of your choice), colored on both sides if desired. The size of the paper square will determine the size of the finished boat. The boat will be about 10 cm (about 4″ long).
Cut Paper and Do Base Folds
You’ll need to cut your square into more of a rectangle – remove about 1 1/2 – 2″ off one side with the scissors.

Fold the rectangle in half and open in back up. Turn the paper a quarter turn and repeat folding in half.

Form a Square
The paper is now folded in half – face the opening facing down. On both sides, fold the top corners down toward the center. Crease.

Fold up the flaps at the bottom on both sides.

Now you have what appears to be a little hat! You’re going to open the base of the hat and pull the sides out. Tuck the paper flap at the bottom as shown.

Form a Second Square
Turn the paper square over so the top is at the top. Fold the bottoms up at both sides and crease to make a triangle.

Now you have a second mini hat. Again, pull the hat open, folding out the sides, and crease.

Fold Out the Sides
One edge of the square will be easy to pull out as shown. You can pull out both sides to form your boat!

Crease the paper and adjust until you are happy.

Don’t forget to float these babies on the water! Sometimes they tilt to the side. They’re still cute!

Are you ready for the video? Learn paper boat origami below. Then let me know what you think in the comments!