Origami Cube with One Sheet
Discover the art of folding a 3D origami cube with a single sheet of paper. This step by step tutorial is perfect for beginners.
Skills Required: None. This is a perfect paper project for beginners, and cubes can be used in a variety of other projects. Get a video at the bottom of the post showing all the folds.

Welcome to I Love Origami, your go-to place for everything paper folding! Today, I’m thrilled to share a fun project that’s perfect for beginners and seasoned folders alike: the origami cube.
With just one 6″ square sheet of paper, you’ll be amazed at how quickly and easily you can create this charming 3D paper cube.
It’s a versatile piece that can be used in a variety of other projects – from decorations and ornaments to fun educational tools for kids. You could make a colorful garland out of these cubes, or even give them as unique gift boxes for tiny surprises. The possibilities are endless!

In this post, I’ll guide you through each step with clear, easy-to-follow instructions. You’ll learn how to make all the right folds, ensuring your cube comes out perfect every time. And don’t worry if you’re new to origami – I’ve got tips and tricks to help you along the way.
While the cube itself may not be deeply rooted in traditional Japanese symbolism, its role in origami is significant. It represents the beauty of geometry, the precision of the craft, and the creative potential inherent in a simple piece of paper.

So, grab your paper, find a cozy spot, and let’s get folding! Trust me, once you see how simple and enjoyable this project is, you’ll be hooked. Ready to create your own origami cube? Scroll down and let’s get started!
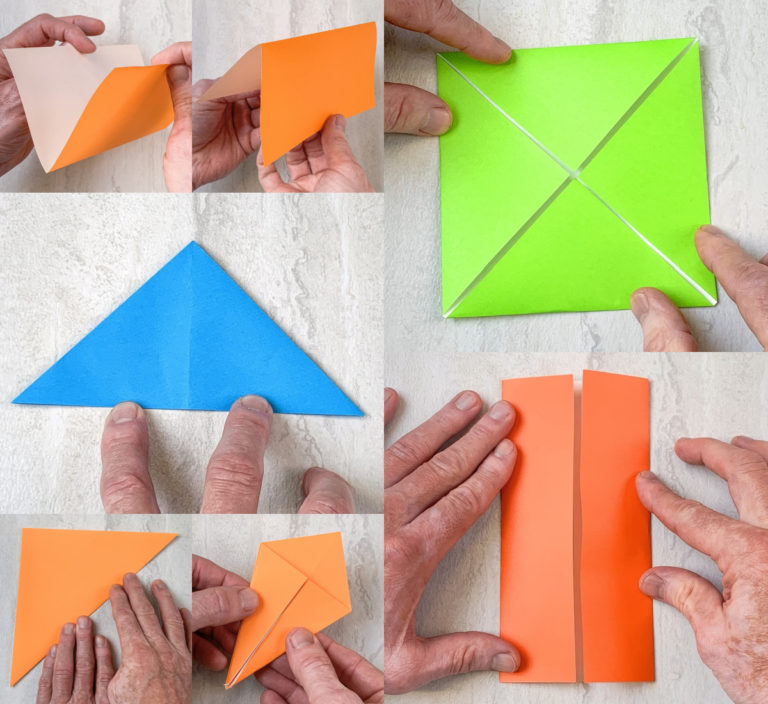
Cube Paper Folding
Begin with a 15 cm (6″) square piece of paper (or size of your choice), colored on both sides. The size of the paper square will determine the size of the finished cube. The cube will be between 38 – 40mm (about 1 1/2″ square).
Do the Base Folds
Place your paper on your surface with the points at the top and bottom. Fold in half, then rotate a half turn and fold in half again.

Turn the paper a quarter turn and repeat what you did before. Fold in half to create a square. Rotate a half turn and fold in half again.

Create the Sides
The paper is now folded in half with the opening facing up. On both sides, push in on the seams you created to create triangles. Fold both sides in and you will have one large triangle.

Create the Top and Bottom
I know this doesn’t look like a cube yet – bear with me. On each side of the triangle, pick up the flaps and fold toward the center. Crease.

Fold in the sides of those flaps to touch the center, and smooth down. Fold down the top flaps, and smooth.

Take the top flaps and tuck them into the side flaps – one on the left and one on the right. You may need to check out the video for this step as it’s a little trickier.

Once you do this on one side, flip over and repeat the same steps.

Form the Sides
One end of the paper will have a hole – you’re going to blow into this end to inflate the cube, and form the sides.

Use a chopstick or other object (with a blunt end) to help you form the rest of the cube. Stick it into the hole and crease each edge of the cube.

And now you have a cube – that you can place on any end. These look great in just about any color! I love having a big bowl of them as part of my home decor.

Are you ready for the video? Learn cube paper folding below. Then let me know what you think in the comments!