Origami Star (Five Pointed)
Craft a five-pointed origami star with ease! This quick guide brings a unique bit of handmade magic to your decor. Start folding today.
Skills Required: None. This is a great project for beginners. Get a video at the bottom of the post showing all the folds.

Ever gazed up at the night sky and wished you could capture a piece of it? Well, now you can bring a twinkle of that celestial magic right into your home with a simple sheet of origami paper.
In today’s post, I’m excited to guide you through the delicate folds of creating a beautiful five-pointed origami star.
Origami is a meditative practice that teaches patience, precision, and creativity. Today’s project, the five-pointed star, is a perfect example of this. It’s more than just folding paper; it’s about creating something that symbolizes light, hope, and the magic of the cosmos.
In this post, I’m thrilled to share a step-by-step guide that will take you through the process of creating your own origami star. Each fold you make will bring you closer to holding a piece of the night sky in your own hands.

Imagine a string of these stars as a festive garland during the holiday season, or a solitary star perched on your bookshelf, bringing a dash of charm and whimsy to your living space. The possibilities for creativity are as limitless as the stars themselves!
And for those who prefer visual learning, I’ve included a comprehensive video tutorial that accompanies this post. It shows every fold.
So, if you’re ready to add a little twinkle to your day, grab your origami paper, and let’s start folding. Let this simple piece of paper ignite your imagination!

Origami Star
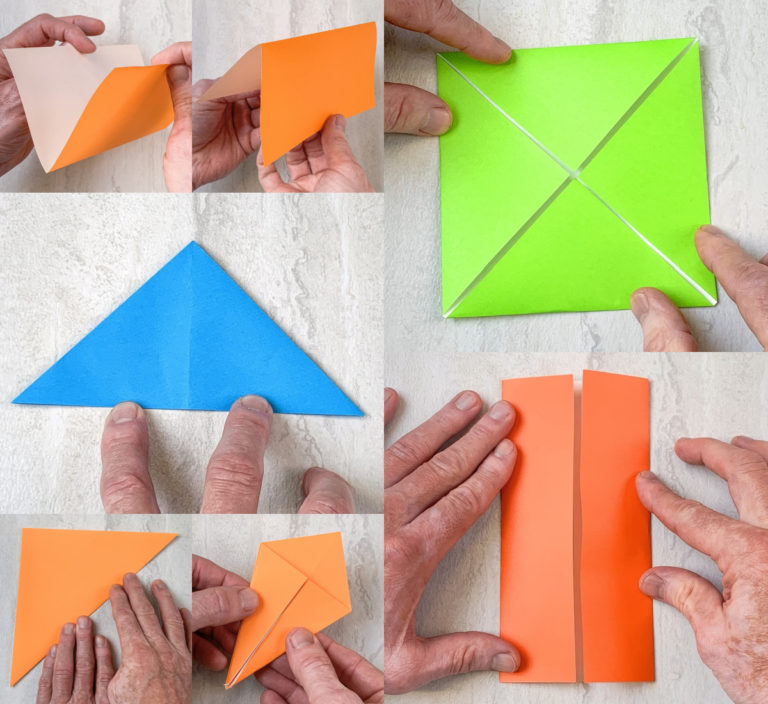
Begin with a square piece of paper, colored on both sides. The size of the paper square will determine the size of the finished star. Score all folds with your thumbnail to obtain a hard crease in the paper.
Make the Base
1. Fold the square in half, edge to edge, to create a rectangle shape.

2. Rotate so that the fold is at the top, fold the bottom half in half again toward the fold, then unfold.

Establish the Base Folds
3. Fold the bottom left corner to the top folded edge, then unfold.

4. Rotate the paper to the right, because you’re going to fold the right side in.

5. Fold the top right corner to the crease that was created in step 3. This is a little over 3 1/2″ down the side of the paper.

6. Rotate the paper so that the fold is along the bottom edge. Fold the top layer of the bottom right-hand corner up and even with the left-hand edge of the project.

7. Fold the bottom right-hand corner up so that it meets the edge of the fold created in the previous step.

8. Fold in half along the intersection that was just created.

9. Crease all folds again with your thumbnail.

Note the shortest edge of the paper to cut in the next step.

Trim the Paper to Form a Pentagon
10. Using scissors, trim the project to the shortest edge, as indicated.

After the cut, you will have a triangle shape.

11. Unfold to reveal a pentagon with 12 creased triangular sections.

Fold in All Edges of the Pentagon
12. Fold the flat bottom edge of the pentagon up so that the corners intersect with the creased lines originating from the top right and left corners.

13. Unfold the pentagon and rotate clockwise, so that the next flat edge is at the bottom.

14. Fold the flat bottom edge of the pentagon up so that the corners intersect with the creased lines originating from the top right and left corners. Repeat this step with all five of the flat edges, rotating the pentagon after each fold. The shape of the five-pointed star can be seen within the creases.

15. Fold the flat bottom up and fold the right side in, while pushing the creased corner out, then fold flat. This creates a triangular point. Unfold the pentagon.

16. Rotate the pentagon clockwise one-fifth turn. Fold the right side in, while pushing the creased corner out, then fold flat. Unfold the pentagon, and repeat this step with the remaining three sides of the pentagon.

Form the Initial Star Shape
Now that the creases are folded in the correct direction, start folding each side as outlined from step 15.

17. When you get to the fifth side, carefully lift up the first side and insert the fifth side underneath the first to complete the star.

18. This overlapping will lock the folds of the five-pointed star in place.

Flip the five-pointed star over on your work surface, and note the smaller pentagon in the middle.

Note the corner of the pentagon and the center of the pentagon to be used in the next step.

Fold in All Edges to Form Points
19. Fold the corner of the pentagon into the center of the pentagon, and crease well with your thumbnail. Make sure that you line up the corners with the center for a clean, finished star.

20. Repeat with the next three corners of the pentagon, carefully folding them into the center of the pentagon.

21. When you get to the last fold, carefully lift up the first fold, and insert the fifth corner inside and underneath the first.

22. The overlapping folds will lock the five-pointed star in place. Crease all folds again with your thumbnail.

Are you ready for the video? Learn how to make an origami star below! Then let me know what you think in the comments!